Up Your Media Apple Web and Tech Blog

Parksville / Qualicum Beach's only Apple Certified Macintosh Technician (ACMT) and Apple Support Professional, Dan LaRocque, posts semi-regular tips and blogs about his day-to-day experiences with Macintosh computer technology, social media, web marketing & design and other technology related developments.

How to Install the Adobe Flash Update

blog3-img1Lots of emails this week about the new Adobe Flash update and how to install it. They seem to update this plugin every 4 to 6 weeks, and it’s essential to many online services like YouTube videos and other sites.

First, go directly to the Adobe.com website and navigate to Downloads.

Select the Adobe Flash update and click to download.
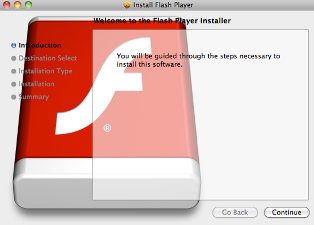
blog3-img2Now this is where most people get tripped up. After downloading the software, you still have to go through several steps to complete the install. Locate the update .dmg (disk mounted image) file in your downloads folder. Double click to launch the installer.
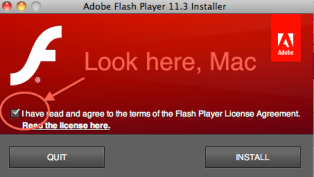
blog3-img3Choose the volume where you wish to install the software (your Macintosh HD) and follow the prompts the installer presents. It will require that you close any browsers, Safari, Firefox etc., before continuing.

You also have to agree to the software terms and conditions.

Once you’ve completed all of these steps, you should be good to go.
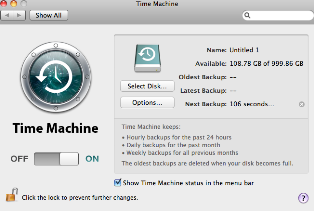
Back Up Your Hard Drive With Time Machine

Backing up your hard drive has never been easier, thanks to the software Apple has been including with your Operating System since Leopard 10.5.

I’ve done it myself, more than once, it’s true. I’ve had hard drives fail on me without having a back-up of any kind. It was devastating, but eventually I learned, and now I keep redundant back-ups of all my data, thanks to the affordability of external hard drives and the native Time Machine software. Still, I see it every week, and my un-scientific study shows a good 40-60% of people still don’t keep a good back-up.

Here’s how easy it is to do: blog2-img1

  1. Plug any external hard drive into the USB port on your Mac.
  2. When the Time Machine software launches and prompts you whether or not you’d like to use said external hard drive as your Time Machine back-up, say yes.
  3. Get some sleep.

Seriously, it’s that easy. In operating systems Mountain Lion 10.8 and previous, you don’t even have to partition the disk, just click yes and ignore. In Mavericks you will have to partition the hard drive as Mac OS Extended (journaled) in Disk Utility, but the software will lead you like an ox by the nose through every step.

The beauty of Time Machine, is that you can access old files that you’ve changed in the past, and restore the old configuration of that file to the present date. Consider if you’ve changed your iPhoto library, or deleted an important email, or edited a movie, document or Garageband file. Also, if your hard drive should fail, and the probability of that is 100%, you can restore your entire system, docs, and network settings from that most recent Time Machine back-up.

Get Some Peace Without Missing What Matters

Our iPhones are useful little devices, but they are also remarkably good at interrupting us.

Messages, phone calls, email, social media, news alerts and app notifications can easily turn a quiet evening into a steady stream of buzzing, banners and beeps.

Fortunately, you don’t have to choose between turning your phone off completely and being available to everyone all the time.

Apple’s Focus feature lets you decide who and what is allowed to interrupt you.

Start with Do Not Disturb

The simplest Focus mode is Do Not Disturb.

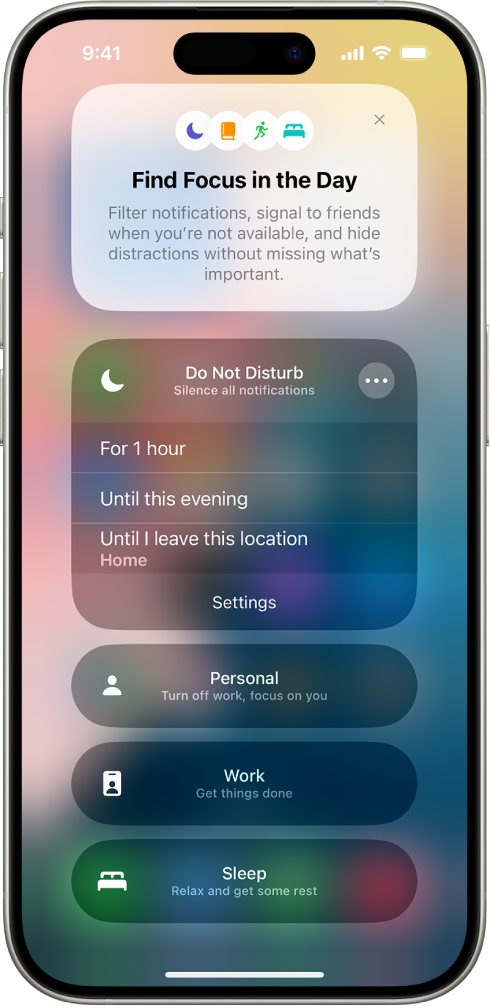
You can turn it on quickly from Control Centre. Swipe down from the top-right corner of your iPhone, tap Focus, then choose Do Not Disturb.

Do Not Disturb in iPhone Focus controls

Your calls, messages and notifications still arrive. Your iPhone simply stops demanding your immediate attention.

You can also choose to turn Do Not Disturb on for a set period of time, such as for one hour or until later in the day.

Set up Focus the way you want it

For more control, open:

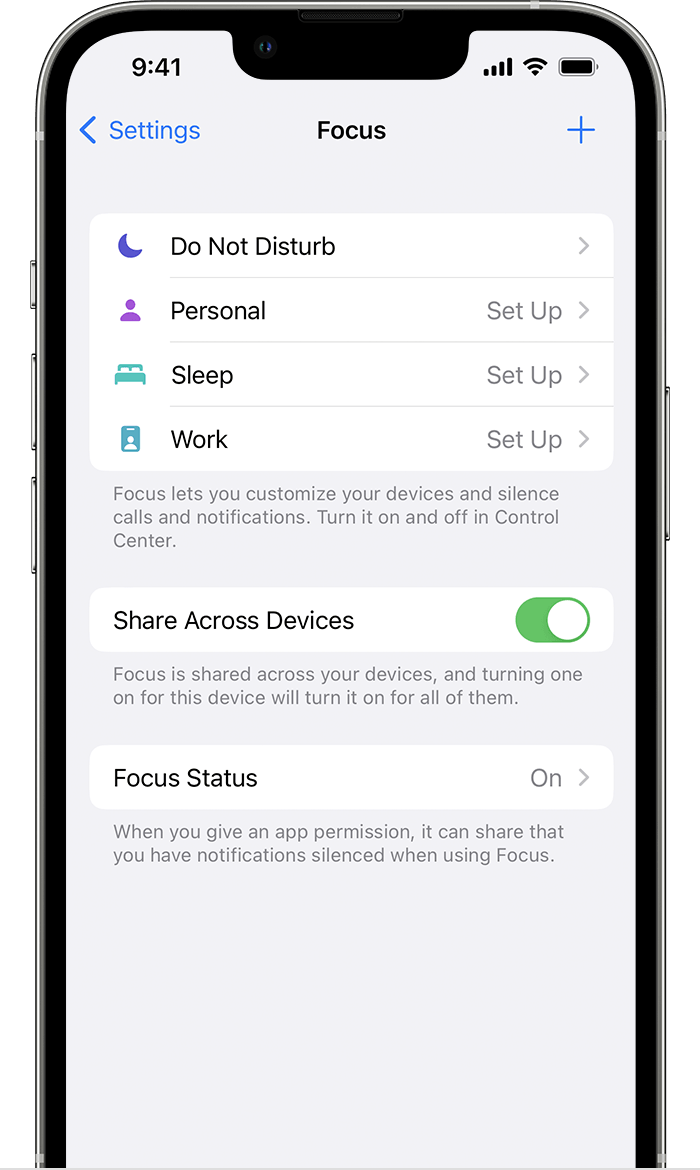
Settings → Focus → Do Not Disturb

From there, you can decide which people and apps are allowed to notify you while Do Not Disturb is active.

iPhone Focus settings showing Do Not Disturb options

Let important people through

Under the People section, you can choose contacts whose calls and notifications should still reach you.

For example, you might allow calls from family members while silencing everyone else.

You can also allow repeated calls, which can be useful in an emergency if someone tries to reach you more than once within a short period of time.

For someone who absolutely must be able to reach you, you can also use Emergency Bypass in that person’s contact settings.

Control which apps can interrupt you

Focus isn’t limited to phone calls and text messages.

Under Apps, you can choose which apps are allowed to send notifications while a Focus is active.

You could create a quiet evening where calls from family still come through while Mail, Facebook, Instagram, news apps and other notifications remain silent.

Or you might create a Work Focus that allows phone calls, Messages and Calendar notifications while keeping everything else quiet.

Have Focus turn itself on automatically

You don’t even have to remember to turn it on.

A Focus can activate automatically based on things such as:

  • A particular time of day
  • Your location
  • Opening a certain app
  • Your sleep schedule

For example, you could have Do Not Disturb turn on automatically every evening and switch off again the next morning.

You can also create separate Focus modes for Work, Personal, Sleep, Driving or almost anything else you want.

Keep it consistent across your Apple devices

If you use more than one Apple device, turn on Share Across Devices under:

Settings → Focus

Your Focus settings can then follow you between your iPhone, iPad, Mac and Apple Watch when you’re signed in with the same Apple Account.

That means putting your iPhone into Do Not Disturb won’t leave your Mac happily chiming away beside you and defeating the entire exercise.

You can still stay connected

Focus isn’t really about disconnecting.

It’s about deciding when your technology gets your attention instead of allowing your technology to decide for you.

Spend a few minutes setting up Do Not Disturb or another Focus and you can have some peace and quiet while still making sure the people who matter can reach you.

Sometimes the smartest thing your smartphone can do is leave you alone.